This tut is written for those with a basic knowledge of psp. I use psp 10.
Supplies needed:
Mask: WSL_Mask83 from weescotslass .
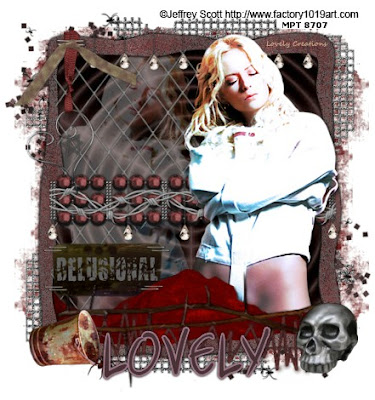
Tube of choice. I used the artwork of Jeffery Scott which can be purchased here: MPT
Scrap kit of choice. I used Delusional from Gothic Inspirations.
----------------------
----------------------
Let's get started :)
1. Gather your supplies and open your psp. Open a new file size 500 x 550 pixels. Flood fill with white. Take paper 20, paste as a new layer.
2. Create new mask layer, make sure 'Invert mask data' is not checked if you use the same mask as me. Merge layer group.
3. Paste frame 3 as new layer above mask layer. Using magic wand tool, select inside frame.
4. Paste paper 4 below frame 3, Invert selection (ctrl/shift/I) then hit delete, and select none (ctrl/D).
5. Paste mesh element as new layer above frame 3. Resize to 75% and position over frame to the left side. Give drop shadow
6. Take GlitterSquareSpillWSpiders and paste it as a new layer below paper 4. Resize to your liking and position so a little sticks out on the upper left corner and lower right corner of frame.
7. Take WireMesh element and paste as new layer above glitter spill, position to the upper right so a little of the mesh sticks out from under the frame. DUplicate layer, mirror and flip.
8. Paste Bead element above frame, resize to 60% and position it in middle of frame. Give a drop shadow.
9. Take Barbwire element and paste as a new layer above the bead element. re size to 83%. Give drop shadow.
10. Take RibbonWCharm, resize 40%, paste as layer above the Barwire. Position at top of frame nearly to the left corner. Give a drop shadow.
11.Paste BowWStaple element above ribbon, resize to 40%. Position over ribbon so it appears they are stapled together to the frame. Give drop shadow.
12. Paste tube above Barbwire, position to the right side of the frame. Give drop shadow. Duplicate layer and mirror. Move duplicated layer beneath frame. Go to layers - properties and change opacity to 40.
13, Paste Thorns as new layer above tube, resize to 65%. Position toward bottom of frame. Give drop shadow.
14. Paste RustyBucket as new layer above Thorns. Resize to 25%, position to lower left corner in front of frame. Give drop shadow.
15. Paste Skull element above Thorns, resize to 25%. Position to the lower right corner in front of frame. Give drop shadow.
16. OPTIONAL: I added in CrumpledPaper element at bottom of frame, to cover part of the tube. The Used the Stitched element to make it appear as if sewn into frame.
17. Crop and resize tag to your liking (if you prefer a smaller tag).
18. Add your name at the bottom of tag, I used StraightJacketBB font at 80 pixels. apply drop shadow.
19. Add in any artist, copyright, & license info and voila! Your tag is done.


Hey hun! I've emailed you several times and haven't heard back. I hope that your doing ok. I've updated my CT, but you are welcome back any time. I love your tuts and your very talented and I miss you as a friend as well. So hang in there. Love, Jess
ReplyDelete